

In the 2.2.1 release of Jetspeed, we introduced three new kinds of PSML templates:
Templates are a special kind of re-usable PSML page. Templates centralize the declaration of portlets and page layout once, which can then be reused on many pages. Templates can save you lots of configuration time maintaining portlets on your pages. And administrator can add or remove a portlet to a template, and all pages associated with that template will pick up those portlets immediately. When you have many pages, templates can save you lots of administration time in publishing changes to each and every page in the system. Templates can also be secured, so that only administrators can modify them. This means that you can enforce sets of pages to always display certain portlets, for example in the left or right column. By securing the template, the templasized portlets are locked in place: they cannot be deleted or moved by the end user, only the administrator can edit the portlets in the template. However, the portlets declared on the merged page can be maintained normally by the end user, based on the security constraints of the target page.
As of version 2.2.2, you cannot edit templates (TPSML, FPSML, DPSML) using the Jetspeed configuration tools. This means they must be edited as XML and then imported into the system. Future versions will support full customization of templates.
Template pages are used in combination with addressable PSML pages to create a merged view of a PSML page with the template. Template Pages are not addressable by URL: therefore you can never visit a template page. Templates are usually defined in enclosing folders, and are automatically merged with all pages in that folder and subfolders. There is a limitation that only one page template can be defined per folder. Templates placed in subfolders will override the template placed in a parent folder. Introducing a template page into the PSML system is as simple as dropping the .tpsml file into the file system (or you can use the Import administrative tool if you are storing PSML in the database).
Templates were first introduced in version 2.2.1. If you download and run the Jetspeed demo, navigate to http://localhost:8080/jetspeed/portal, you will see an example of templates in action on the welcome page as shown in the screen shot below...
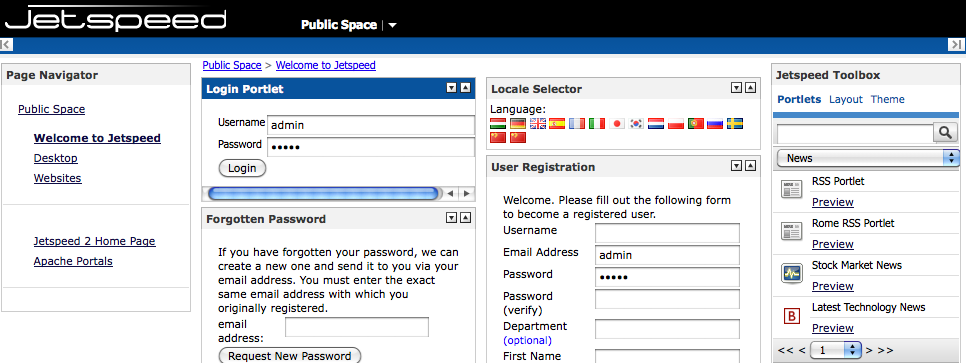
The two portlets found in the far left and far right column are the Jetspeed Toolbox and Page Navigator portlets. These portlets are declared in a template, not in the actual pages (.psml). On the Page Navigator, press the Websites link, navigating to http://localhost:8080/jetspeed/portal/frames.psml. You will again see the Jetspeed Toolbox and and Page Navigator portlets. These two portlets were declared only once, in a Page Template, not on each page.
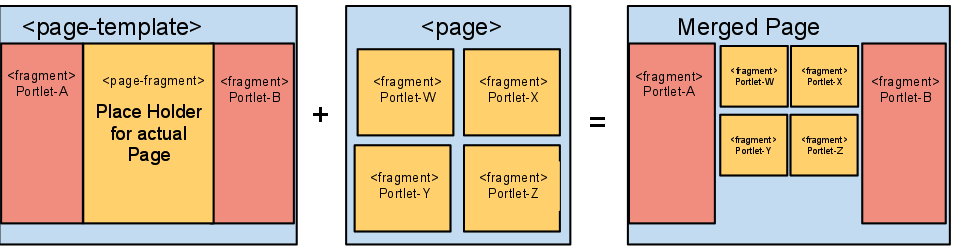
As the visual below demonstrates, page templates merge a template with an addressable page, resulting in the displaying of a merged page:
 How to Create a Page Template
In this section, you will learn how to create your own template pages (TPSML) in Jetspeed. Note that all the examples included here were testing on the Classic (Portal) Pipeline (/jetspeed/portal) with the 2.2.2 release of Jetspeed. Templates are designed to work with both the JetUI Pipeline as well as the Classic Pipeline. However, the JetUI pipeline has some special requirements, most notably is that it treats the Page Navigator and Toolbox as special portlets, and expects them to always be on all templates. The Classic Pipeline does not have any restrictions as of version 2.2.2. Another important issue to be aware of - up through version 2.2.2, templates may only be defined in XML definitions. There are no customization features for creating these templates with the Jetspeed customizer. Future releases will provide template customizers. To learn more about using templates with the JetUI Pipeline, read the JetUI documentation. The remainder of this document assumes you are using the Classic (/portal) pipeline. To learn more about using pipelines, read the Pipelines documentation
Lets get started creating a new page template. You will need to have Jetspeed running in order to facilitate demonstrating how templates work. First, start up Jetspeed, navigate to http://localhost:8080/jetspeed/portal, and login to the demo system with the admin user, password also admin. Navigate to any other page with the Page Navigator. You will always see the Page Navigator portlet in the left column, and the Jetspeed Toolbox in the right column. The end user cannot remove these portlets with the Jetspeed Customizer, not even the admin user. No matter which page you navigate to, you will see the default system template that comes with the demo. This template file is template.tpsml, and it is located in the pages directory of the demo distribution. (If you built Jetspeed from source, it will be located in WEB-INF/pages). Lets override the page template for the Admin user home space. Remember that spaces are accessible from the drop down menu in the Jetspeed header. From the Spaces menu, select My Pages. Selecting My Pages will display a page located at the URL http://localhost:8080/jetspeed/portal/_user/admin On the file system, the home space for the admin user is actually located under pages/_user/admin. Go ahead and find that directory on your file system before proceeding.
Now bring up a text editor, and create an empty file named template.tpsml. Place that file in the pages/_user/admin folder. Jetspeed will now automatically use your new template for all pages in that folder (and any subfolder of the pages/_user/admin space folder). When creating a Page Template, you will want to reference the Jetspeed 2.2 XML Schemas. You can find the XML Schema declaration here: http://portals.apache.org/jetspeed-2/2.2/schemas/tpsml.xsd" All of your page template TPSML pages should start as follows...
<page-template id="definition"
    xmlns="http://portals.apache.org/jetspeed"
    xmlns:xsi="http://www.w3.org/2001/XMLSchema-instance"
    xsi:schemaLocation="http://portals.apache.org/jetspeed http://portals.apache.org/jetspeed-2/2.2/schemas/tpsml.xsd">
The root tag must always be declared as <page-template>. Page templates are an extension of plain PSML pages. Page templates can have many of the same XML elements as a page such as titles and fragments. Recommend becoming familiar with standard PSML pages before continuing. However, there are some important differences:
The <page-fragment> tag is important. It declares where the current page will be inserted and merge into your template.
..
    <page-fragment id="template-admin-home">
      <property name="row" value="0"/>
    </page-fragment>
...
Notice that a page-fragment can have typical fragment attributes like id as well as sub-elements like row and column. The page-fragment tag is the place holder for the addressable page. The addressable page is merged in at this point, specified by the optional row and column properties, combining the template fragments with the fragments from the addressable page. Here is a complete template page definition for the admin home space. Go ahead and cut and paste this example into your text editor and save the file under pages/_user/admin/template.tpsml:
<?xml version="1.0" encoding="UTF-8"?>
<page-template id="admin-definition"
    xmlns="http://portals.apache.org/jetspeed"
    xmlns:xsi="http://www.w3.org/2001/XMLSchema-instance"
    xsi:schemaLocation="http://portals.apache.org/jetspeed http://portals.apache.org/jetspeed-2/2.2/schemas/tpsml.xsd">

  <title>Example Template</title>
  <fragment id="example-template-top" type="layout" name="jetspeed-layouts::VelocityThreeColumns">
    <property name="sizes" value="15%,70%,15%"></property>

   <fragment id="example-left" type="layout" name="jetspeed-layouts::VelocityOneColumn">
        <property name="row" value="0"></property>
        <property name="column" value="0"></property>
		<fragment id="example-locale" type="portlet" name="j2-admin::LocaleSelector">
            <property name="row" value="0" />
             <property name="column" value="0" />
         </fragment>
        </fragment>

    <page-fragment id="example-page-template">
      <property name="column" value="1"/>
      <property name="row" value="0"/>
    </page-fragment>

   <fragment id="example-right" type="layout" name="jetspeed-layouts::VelocityOneColumn">
        <property name="row" value="0"></property>
        <property name="column" value="2"></property>
		<fragment id="example-forgotten" type="portlet" name="j2-admin::ForgottenPasswordPortlet">
                <property name="row" value="0" />
                <property name="column" value="0" />
        </fragment>
   </fragment>

  </fragment>
</page-template>
Refresh the page http://localhost:8080/jetspeed/portal/_user/admin. You should now see some differences: like the Navigator and Toolbox are gone, and in their place are the portlets that you defined above, namely the Local Selector and Forgotten Password Portlet. Take a closer look at the XML file. Notice that we are using Jetspeed layout portlets to define the layout of the templacized page. In this example, we have a three column layout. The left column is defined by the example-left fragment. The middle column is key: this is our page-template and it will hold the actual PSML page. The right column is defined by the example-right fragment. When the template is merged with the page that you navigate to, the end result will contain a left and right column from the template, and a middle column containing the referenced page. This referenced page can have its own layout. For example if the referenced page has two columns, then the resulting merged page will have four columns, two from the template, and two from the included page.
There is a problem though. First problem, you are stuck on this page, there are no longer any navigations available to you. Lets fix that by adding a Space Navigator to your template. Paste this code fragment into your file just above the fragment with an id of example-left and save the file:
    <fragment id="jsSpaceNavigator" type="portlet" name="j2-admin::SpaceNavigator" decorator='clear'>
            <property name="y" value="300"></property>
            <property name="x" value="20"></property>
            <property name="state" value="detach"></property>
    </fragment>
Refresh the page. You should now see a Space Navigator in the top area of your page. An interesting aspect of this fragment is that it is detached and placed at a specific coordinate on the page. Detached portlets are placed in a different plane than flow-driven layout portlets, whose positions are relative to their placement in the PSML definition. To read more about detached portlets see the JetUI documentation.
There is another problem. We cannot navigate within the My Pages folder. In order to do that we need a Page Navigator. Lets add one to the template, so that all the pages in this folder can use it. Paste in the code snipped below immediately after the fragment end tag of the fragment with an id of example-locale:
    <fragment id="jsPageNavigator" type="portlet" name="j2-admin::PageNavigator">
                        <property name="row" value="1"></property>
                    <property name="column" value="0"></property>
                    <property name="state" value="normal"></property>
                    <property name="tool" value="true"></property>
    </fragment>
Refresh the page. You should now see a page navigator portlet immediately below the Locale Selector portlet on the left hand side of the page. As you navigate to other pages in this folder, such as the My Account page, you should always still see our four portlets from the template (Locale Selector, Page Navigator, Forgotten Password, and the Space Navigator).
We hope these examples helped getting you started using page templates in Jetpeed. If you have further questions, do not be shy about asking questions on the Jetspeed Users List.
Fragment Definition Pages are buckets for declaring reusable portlet definitions which can then be referenced and placed in normal PSML files. Whereas TPSML pages also follow a reuse pattern, FPSML is similar but solves a slightly different case. TPSML is reuse by template. You will always get the entire layout of the template. Your page is included inside the template. The FPSML use case is different. With FPSML, your page will is the container where fragment definitions are included into the your page.
As the visual below demonstrates, fragment definitions are included into any page (or page template) resulting in a merged page of both normal portlet fragments as well as fragment references to fragment definitions:
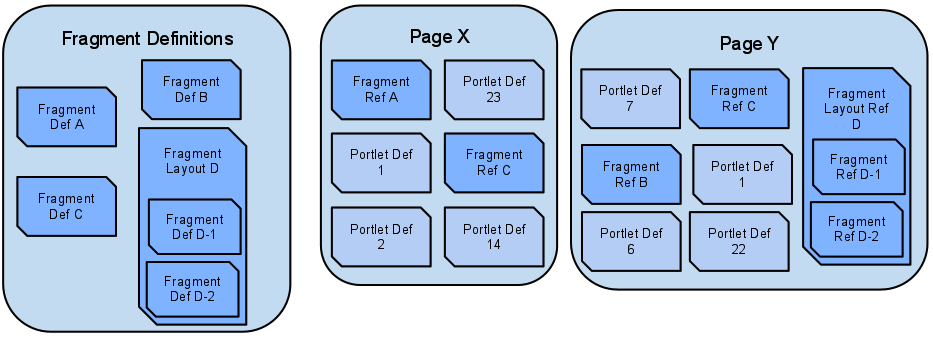
In the diagram above, four fragment definitions have been defined. Three of these definitions (Fragment Def A, Fragment Def B, Fragment Def C) are portlet fragments. The fourth is a layout fragment (Fragment Layout D), which contains two portlet fragments (Fragment Def D-1, Fragment Def D-2).
On Page X, four portlets are defined directly on that page (1,2,14,23). There are also two fragment references (A,B). The fragments are not directly defined on Page X, they are only referenced.
On Page Y, four portlets are defined directly on that page (1,6,7,22). There are also two fragment references (B,C). The fragments are not directly defined on Page Y, they are only referenced. Additionally, Page Y has a fragment layout reference (D). Inside this fragment layout reference, there are two fragment portlet references (D-1, D-2).
At this point, you may be asking: what benefit is it to declare a fragment definition outside of the page definition? Benefits of Using Fragment Definitions
In this section, you will learn how to create your own fragment definition pages (FPSML) in Jetspeed, and then use those fragment definitions in a PSML page using fragment references. Note that all the examples included here were testing on the Classic (Portal) Pipeline (/jetspeed/portal) with the 2.2.2 release of Jetspeed. Fragment definitions are designed to work with both the JetUI Pipeline as well as the Classic Pipeline. An important issue to be aware of - up through version 2.2.2, fragment definitions and fragment references may only be defined in XML definitions. There are no customization features for creating these fragment definitions with the Jetspeed customizer. Future releases will provide fragment definition editors.
Lets get started creating a new fragment definition. You will need to have Jetspeed running in order to facilitate demonstrating how fragment definitions work. First, start up Jetspeed, navigate to http://localhost:8080/jetspeed/portal, and login to the demo system with the admin user, password also admin.
One important rule to follow: there may only be one fragment definition per FPSML file. If you would like to create another fragment definition, then create another file and store it there. Lets create a new fragment reference file. Bring up a text editor, and create an empty file named example.fpsml. Place that file in the pages/ folder. When creating a fragment definition, you will want to reference the Jetspeed 2.2 XML Schemas. You can find the XML Schema declaration here: http://portals.apache.org/jetspeed-2/2.2/schemas/fpsml.xsd" All of your fragment definition FPSML pages should start as follows...
 <fragment-definition id="definition"
    xmlns="http://portals.apache.org/jetspeed"
    xmlns:xsi="http://www.w3.org/2001/XMLSchema-instance"
    xsi:schemaLocation="http://portals.apache.org/jetspeed http://portals.apache.org/jetspeed-2/2.2/schemas/fpsml.xsd">
The root tag must always be declared as <fragment-definition>. Fragment definitions can have a few of the same XML elements as a page fragments. The main element they have in common is the fragment tag. If you have not already, we recommend becoming familiar with standard PSML pages before continuing. However, there are some important differences:
The second limitation is not really so different than a PSML page, which are also limited to only root fragment per page as well. But on a PSML page, this fragment must be a layout fragment. With fragment definitions, this fragment may be a single portlet fragment.
..
 <fragment id="hometown-weather-def" type="portlet" name="demo::WeatherPortlet">
      <preference name="city">
        <value>Miami, Florida</value>
      </preference>
 </fragment>
...
Notice that a fragment definition can have typical fragment attributes like id as well as sub-elements like preference. Declaring preferences here is one of the more important techniques for using fragment references. By declaring the preference on this page, you can reuse variations of portlets based on their preferences, and lock down these preferences on a many pages. Here is a complete fragment definition for our example. Go ahead and cut and paste this example into your text editor and save the file under pages/example.fpsml
<?xml version="1.0" encoding="UTF-8"?>
<fragment-definition id="definition"
    xmlns="http://portals.apache.org/jetspeed"
    xmlns:xsi="http://www.w3.org/2001/XMLSchema-instance"
    xsi:schemaLocation="http://portals.apache.org/jetspeed http://portals.apache.org/jetspeed-2/2.2/schemas/fpsml.xsd">

  <title>Weather</title>
 <fragment id="hometown-weather-def" type="portlet" name="demo::WeatherPortlet">
         <preference name='weather_state'>
        <value>FL</value>
      </preference>
      <preference name='weather_city'>
        <value>Miami</value>
      </preference>

 </fragment>

</fragment-definition>
Jetspeed will now automatically know about your fragment definition. The next step is to reference that definition.
How to Reference a Fragment DefinitionWith fragment references, you can place your fragment definitions on any page or template page. Fragment references have almost the same XML schema as fragments, the only difference is in the name of the tag fragment-reference, and the refid attribute on that tag. Here is a fragment reference, referencing our fragment definition:
..
  <fragment-reference id="dp-25-wp-reference" refid="hometown-weather-def">
        <property name="row" value="5"/>
        <property name="column" value="0"/>
    </fragment-reference>
...
It is important to always give the id attribute a unique id attribute across all fragments and fragment references. The refid attribute is hometown-weather-def, linking this reference to the actual fragment definition. Lets add this fragment reference to the home page. Edit pages/default-page.psml, and add the fragment reference anywhere under the root fragment collection (the layout fragment), for example right before the very last ending fragment tag. Save the file, and visit the home page http://localhost:8080/jetspeed/portal, and login to the demo system with the admin user, password also admin. The referenced fragment will show up in the first column, fifth row. It should now be using the preference from the fragment definition (Miami, Florida).
Dynamic templates are reusable portal page used with matching content URLs within the portal. Like page templates, dynamic pages are merged with pages. You can also put fragments and fragment references on a dynamic page. Dynamic pages are matched to portal content page requests by URL and content type mappings: matching pages are selected from current or parent folders. Only one dynamic page per content type should be defined per folder.
Dynamic Pages are used in combination with Content and Request URL Mapping configuration. URL mapping configuration handles the dynamic part of mapping a request URL to portlets designed to retrieve content from content management systems or other web sites. This makes it possible to map the content space of an external system directly onto the URL space of the portal. Jetspeed can, out of the box, map the URL space of a website into the portal, using the DynamicWebContentPortlet combined with our virtual DPSML (Dynamic Template Pages). To see an example of this running with JetUI, startup Jetspeed, login as admin, and navigate to http://localhost:8080/jetspeed/ui/content/. (Do not forget the ending /, it is necessary.) You will see the Apache Portals website running inside a Dynamic Web Content Portlet.
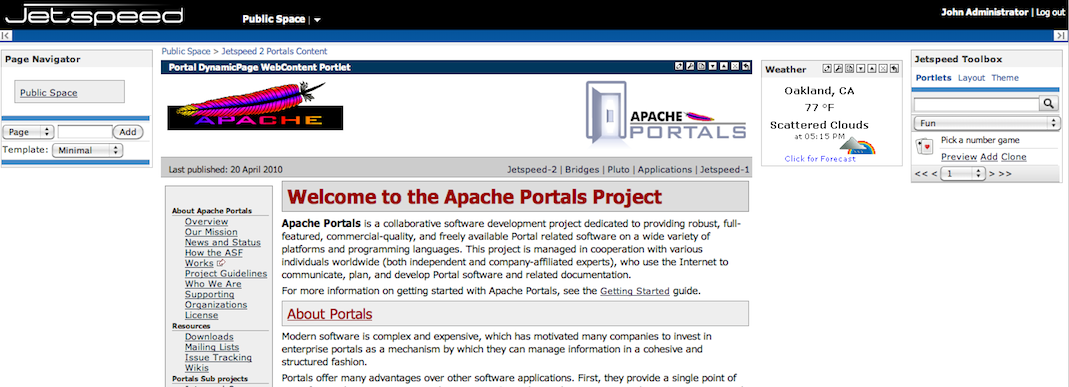
Notice how there is a Page Navigator on the left side, and on the right the usual Toolbox. The Apache Portals website is hosted in the middle. Additionally, there is a Weather portlet next to it. Here is where the interesting part comes in. Click on any of the links in the Apache Portals navigation panel, such as the News and Status link. Notice how when you click on links inside the hosted website, the whole page is re-rendered. Look at the URL. When you clicked on the News and Status link, the URL should have changed to http://localhost:8080/jetspeed/ui/content/news.html Dynamic pages allow you to frame external websites inside a Jetspeed template, and mix the content of the websites along with configured portlets and layouts. And, the URL space of the external website is mapped and mounted onto the URL space of the portal. Mounting URL spaces is configured in the Content and Request URL Mapping Guide. In this example, we are mapping a base URL of http://portals.apache.org/. Any path beyond the base URL is mounted onto the Jetspeed base URL, http://localhost:8080/ui/content/.
Taking a slightly more complicated example, click on the Jetspeed-2 link in the top area of the dynamic web content portlet, and then navigate to the Features link. Inside the portlet, you have navigated to http://portals.apache.org/jetspeed-2/features.html. The mounted URL is http://localhost:8080/jetspeed/ui/content/jetspeed-2/features.html.
The configuration of a DPSML page is not much different than the configuration of a TPSML page. Lets take a look at the DPSML page used in the above example. First, there is the dynamic-page element, telling Jetpeed we are defining a Dynamic PSML page:
<dynamic-page id="default-content" content-type="*"
    xmlns="http://portals.apache.org/jetspeed"
    xmlns:xsi="http://www.w3.org/2001/XMLSchema-instance"
    xsi:schemaLocation="http://portals.apache.org/jetspeed http://portals.apache.org/jetspeed-2/2.2/schemas/dpsml.xsd">
From here on, the page does not look any different from any other PSML page. It is up to the portlet developer to create a portlet capable of using the Jetspeed Dynamic Content Mapping API. Jetspeed provides one: j2-admin::DynamicWebContentPortlet. This portlet uses two preferences to configure dynamic content. The SRC preference provides the URL of the website being proxied. The PORTALPATH preferences defines the mounted path prefix onto the Jetspeed URL namespace.
    <fragment id="dcdp-2-dynamic-content" type="portlet" name="j2-admin::DynamicWebContentPortlet" decorator="gray-gradient-noborder">
      <preference name="SRC">
        <value>http://portals.apache.org/</value>
      </preference>
      <preference name="PORTALPATH">
        <value>/content/</value>
      </preference>
    </fragment>
Besides supporting virtual websites, DPSML plus the Jetspeed Dynamic Content Mapping API can be used to integrate other content systems such as Content Management Systems or Wikis into the portal.