


This document is a step by step guide to building a custom Apache Portals Jetspeed-2 portal with Maven-2. The Maven-2 project provided with this document will:
This document is for Maven-2 build systems. To build with Maven-2, see the accompanying document "Building Custom a Jetspeed Portal with Maven-1"
For documentation on deploying the WAR and EAR files created here, see the document "Deploying Jetspeed to Websphere"
This document will teach you how to build and configure a custom Jetspeed Portal and create deployable archives for Websphere 6.1 and Tomcat 5. The complete source code, projects and deployment environment are described in this document. Deployments are based upon the J2EE standard "Web Application" and "Enterprise Application" deployment. The build is based on the Apache Portals Jetspeed-2 "Maven-2 Custom Build".
Jetspeed is an open source project, thus all source code is freely available from Apache. See the website for more details: http://portals.apache.org/jetspeed-2/
This document assumes that the user is familiar with open source Java development. In particular the Apache Software Foundation (ASF) and the essential Apache open source projects:
| Product | Version |
| Ant | 1.6.5 or higher |
| Eclipse | 3.1.1 or higher |
| Maven | 2.0.4 or higher |
| Sun JDK | 1.4.2 or 1.5 |
| Tomcat | 5.5.12 (with Java 1.4 compatibility) or higher |
| IBM Websphere | 6.1.0.2 or higher |
The example project accompanying this document is called Jet Express. It is a custom Jetspeed portal project. Custom projects are how you build a customized version of Jetspeed. With a custom project, you can override:
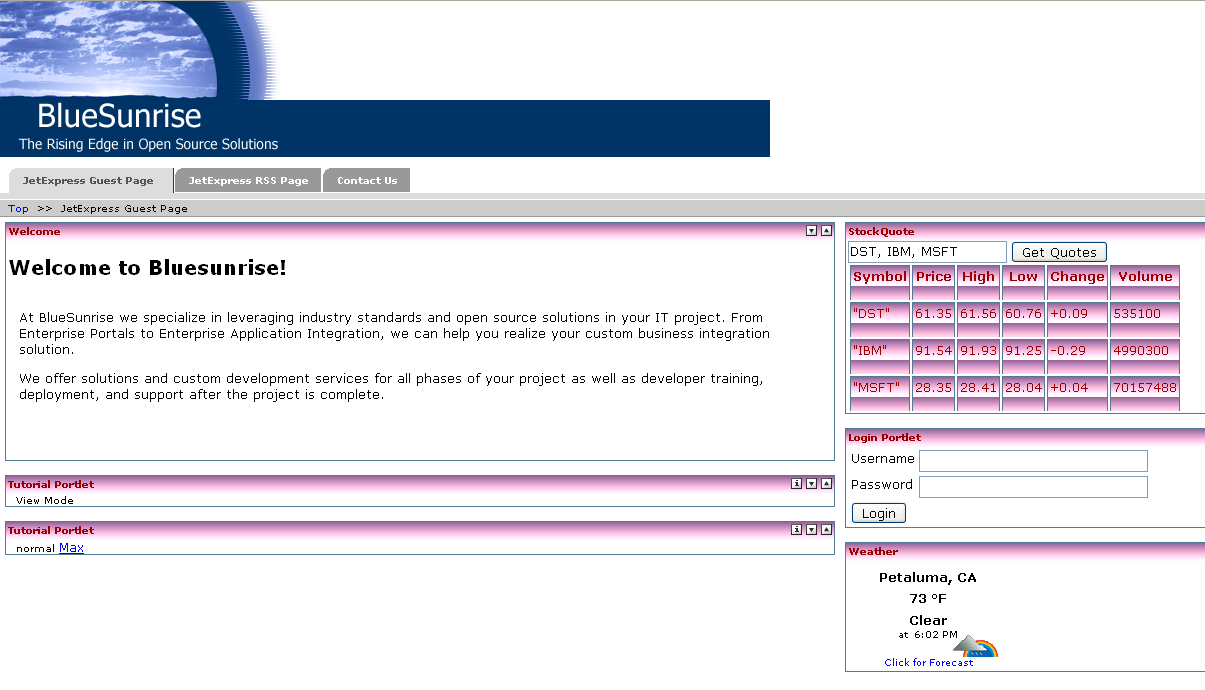
Here is what the customized portal will look like after it is built:

As you can see, it doesn?t look like the default Jetspeed portal that you can download from Apache. Custom builds are best for developers to integrate their own portlet applications and portal features into a customized build environment.
The Jet Express project contains the following sub project builds:
With this build environment, you will be able to build both a portal and a portlet application. By following the examples in this document, the goal is to teach you how to create your own custom portal with a similar custom build project as Jet Express.
The system path will need to include Java, Maven and Ant.
Under Windows XP, the Environment Variables and the System Path is modified by going to the Start Menu -> Settings -> Control Panel -> System -> Advanced -> Environment Variables.
Note: You need administrative privileges to be allowed to modify system environment variables.
With these settings configured, you then have to make your system Windows PATH variable based on the executable directories for:
mvn -v
This command should display the current version of Maven-2.
The build environment uses the Maven-2 project management tool (http://maven.apache.org). One thing that Maven does well is managing Java jar files and maintaining versions of those files. Maven stores all jar files for almost every known open source project on the planet in a set of distributed repositories on the internet. Maven project descriptors reference specific versions of the jars, and the jars are downloaded to a local repository in order to build the system.
By default Maven looks for the local repository in a directory named ".m2" found under your Home directory which on Windows XP usually is found under the "Documents and Settings" directory.
We have provided a distribution of the entire Maven-2 repository required to build your custom portal. Simply unzip the repository.zip file into your $HOME/.m2/repository directory. You are now ready to start building with Maven and Jetspeed.
The first step is to create a new portal project. In our example, we create a new custom Jetspeed project named "jetexpress-2". Archetypes are Maven templates for creating other Maven kinds of projects. Jetspeed provides several archetypes:
From the directory above where you want to create the project, issued this command:
			mvn archetype:create
    -DarchetypeGroupId=org.apache.portals.jetspeed-2
    -DarchetypeArtifactId=portal-archetype -DarchetypeVersion=2.1-dev
    -DgroupId=bluesunrise
    -DartifactId=jetexpress-2
    -Dversion=1.0
This command will create a new subdirectory named "jetexpress-2". Under that subdirectory, you will find the shell for a complete Jetspeed portal custom project.
Note that this and other archetypes can issue many harmless warnings while expanding. Please ignore the warnings unless the expansion of the archetype template fails. When complete, the portal archetype expansion will contain the following structure within a directory named as the specified artifactId relative to the current working directory:
The archetype also contains a settings.xml.sample that is a subset of the Jetspeed-2 source build parameters. If one has not previously configured the ~/.m2/settings.xml file as described above, this sample can be used to do so without J2 test configurations.
The first step in using the Maven2 build is to either:
For our example, we are going to copy over pre-configured resources, including the settings.xml on top of our project to make the tutorial more useful.
The Jet Express project has already been created for you. We ran the archetype:create command, then created all the resources and portlets to make up our custom portal. Lets go through the steps we went through, so that you can apply these same steps to your custom build.
NOTE: the steps below are not necessary with the training material
Create your portal application by running archetype:create for example:
mvn archetype:create
    -DarchetypeGroupId=org.apache.portals.jetspeed-2
    -DarchetypeArtifactId=portal-archetype -DarchetypeVersion=2.1-dev
    -DgroupId=bluesunrise
    -DartifactId=jetexpress-2
    -Dversion=1.0
This command will create a new subdirectory named "jetexpress-2". Under that subdirectory, you will find the shell for a complete Jetspeed portal custom project.
Jetspeed also have an archetype for creating a portlet application:
mvn archetype:create
   -DarchetypeGroupId=org.apache.portals.jetspeed-2
   -DarchetypeArtifactId=application-archetype
   -DarchetypeVersion=2.1-dev
   -DgroupId=bluesunrise
   -DartifactId=express-demo2
   -Dversion=1.0
The training material comes with a full express-demo2 portlet application. We have already written the portlets.
Maven can create the eclipse project files for you:
mvn eclipse:eclipse
PSML pages go in the portal/src/webapp/WEB-INF/pages directory by default:
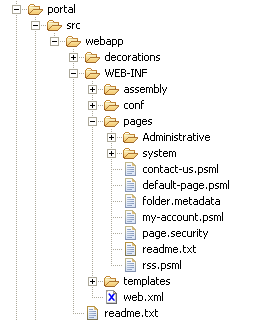
Usually each portal has a set of default PSML pages. The users will create their own pages as they use the system.
Decorators go in the portal/src/webapp/decorators directory by default:
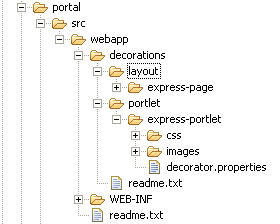
Here we have two kinds of decorators: page (layout) and portlet decorators. We have defined one of each. The page decorator defines the skin for the pages in our portal. The portlet decorator defines the default skin for the portlets.
We need to edit a few files to help automate the Maven build so that it automatically deploys the Jet Express 2 portlet applications. Edit the applications/pom.xml file:
<modules>
	<module>express-demo2</module>
</modules>
Edit the root pom.xml file:
<dependencyManagement>
	<dependencies>
  	...
		<dependency>
			<groupId>${pom.groupId}</groupId>
			<artifactId>express-demo2</artifactId>
			<type>war</type>
			<version>${pom.version}</version>
		</dependency>
Finally, for deployment, add your new portlet application to the app-servers POM found under app-servers/pom.xml:
<!-- custom portlet app -->
<dependency>
	<groupId>${pom.groupId}</groupId>
	<artifactId>express-demo2</artifactId>
	<type>war</type>
	<version>${pom.version}</version>
</dependency>
To hot deploy your custom portlet application to Tomcat, add it to the app-servers Ant script for Tomcat:
<target name="hot-deploy-apps">
...
	<antcall target="hot-deploy-war">
		<param name="org.apache.jetspeed.deploy.groupid" value="${portal.groupid}"/>
		<param name="org.apache.jetspeed.deploy.artifactid" value="express-demo2"/>
		<param name="org.apache.jetspeed.deploy.version" value="${portal.version}"/>
	</antcall>
Now you are ready to deploy your new portal and portlet application. In this example, we will deploy to Tomcat:
mvn ?P tomcat
Startup Tomcat, and go to:
http://localhost:8080/jetexpress-2
By default, only WAR files are generated. To generate an EAR file, edit the root pom.xml and uncomment this line:
enterprise
The EAR file will be generated into the enterprise/target directory.
You can deploy the generated EAR file as is into Websphere. We have tested this EAR with Websphere 6.1. Please read the accompanying document, "Deploying Jetspeed to Websphere.doc" for more information.
For fast servlet and portlet development, nothing seems to beat developing with Tomcat. Say you make a change to a Java class in the Express Demo portlet application. To build and redeploy:
			cd applications
			cd express-demo2
			mvn
			copy target\express-demo2-1.0.war \JetspeedTraining\tomcat5\webapps\express-demo2.war
Wait a few seconds, and your changes should be deployed by Tomcat.